I BOUGHT A WRECKED FERRARI 812 & ATTEMPTED TO REBUILD IT IN 24 HOURS
0 up · 0 down · 0 ratings
Promos
Grab a Yfood Taster pack for 30% off here - bit.ly I bought a wrecked Ferrari 812 Superfast from an auction then i attempted to rebuild the car within 24hours of labour. But as always more unexpected damage was found which held us back alot on the rebuild. To learn how to weld with @the-machine-shop (BOB) click here - the-machine-shop.co.uk For all CT carbon bodykits use code MA10 - ctcarbon.co For all Alloys,Tyres and Wheel refurbishment visit - wheelmania.co.uk
ALL HWBT MERCH
Channels and socials
FOR MORE CONTENT
CHECK OUT MY SECOND CHANNEL
Follow Me Here Aswell
Notes
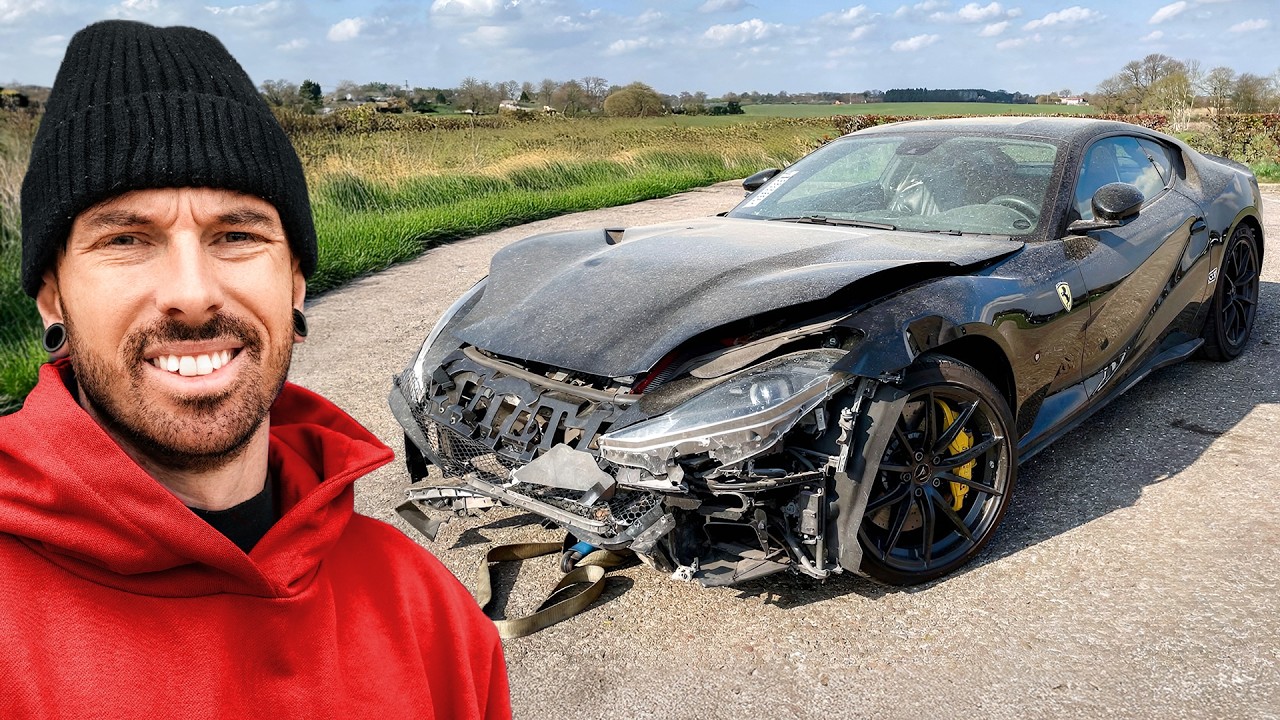
I just bought this wrecked Ferrari 812 Superfast from Copart and set out to rebuild it in 24 hours, a challenge that would push both the team and the car to their limits. The initial impression is that the car had decent miles and could run, but the damage looked comprehensive once the crew pulled it onto the shop floor. Early on the plan is simple: assess the engine, verify the interior electronics, and determine whether the V12 powerplant is salvageable. What follows is a rollercoaster of discovery, setbacks, and improvisation as the crew documents every critical step of the rebuild. The first big hurdle is getting the car out of park and confirming there is oil in the engine. They discover milky oil, a sign of water ingress, and the dipstick test confirms a potentially compromised engine. The team disassembles the air intake and checks each cylinder with a camera to see if there is sludge or water. This becomes the throughline of the project, because without a healthy engine, the rebuild cannot proceed as planned. With the engine assessment underway, the video shifts to the scope of body work and structural repairs. They find major front-end damage, dented chassis legs, and a cracked radiator support, which will require bespoke welding and fabrication. Bob from The Machine Shop is brought in to weld and reshape the chassis components, while Mat focuses on removing airbags, seats, and dashboards for a proper rebuild of the interior. The collaboration between Mat and Bob forms the backbone of the project, showing a blend of high-tech repair and hands-on fabrication. As parts and panels are stripped, the team addresses the critical safety systems by sending airbags and belts to an airbag specialist for reset and replacement. They carefully remove the airbag control modules and the seat belts, ensuring the crash data and explosive charges are reset and legal, ready for reassembly. The interior comes apart in a controlled fashion, revealing a complex web of electronics and structural anchors that must be precisely reinstalled. The video emphasizes safety, as improper handling of airbags could be dangerous and illegal, so proper channels are used for reconditioning. The project takes a dramatic turn when the real scope of the damage becomes clear: cooling system damage, a compromised oil system, and potential head gasket issues loom large. The crew tests the engine by cranking it with new oil and a refilled system, only to find that the PCV system shows milky oil again, suggesting continued water ingress or oil mixing. They decide to drain, clean, and re-fill the oil system multiple times to flush contaminants and verify that the engine can sustain a future start. This phase demonstrates the unpredictable nature of salvage rebuilds, where a seemingly minor issue can cascade into a larger engine rebuild. With the engine showing signs of life but potential internal damage, the team hinges their plan on front-end reconstruction to restore spray-line accuracy and alignment. Bob fabricates and welds new chassis legs, while Mat handles the cosmetic and structural elements, preserving as much of the original structure as possible to stay true to the Ferrari design. The process includes careful measurement, alignment checks, and iterative fits as both sides of the car are brought back to square geometry. Seeing the chassis take shape gives the audience a sense of progress amid the ongoing technical challenges. Color selection becomes a light-hearted contrast to the heavy technical work. After a long deliberation about green versus purple, they opt for a bold neon green wrap that signals the car’s transformation from wreck to standout. The wrap process is meticulous, with special attention to the bumper recesses, door panels, and edges to ensure a high-gloss, paint-like finish. The car’s visual transformation is captured against the backdrop of relentless workshop activity, underscoring the balance between aesthetics and engineering. With the bodywork coming together, the interior reassembly ramps up. They reinstall door cards, dashboards, and the steering wheel airbag, while streamlining the seat belts and airbags through the repair chain. The team identifies and replaces damaged panels, refits the airbag modules, and carefully reconnects electrical harnesses, all while the clock ticks toward the video’s 24-hour mark. There is a palpable mix of relief and anticipation as the cockpit begins to resemble a functioning Ferrari occupant environment again. The rear of the car also undergoes significant work, including diffuser removal and a plan to reattach or replace rear components and lights. They document the process of removing trim pieces, lights, and badges, confirming the bumper’s alignment and ensuring the car’s rear geometry matches the front. The wraps, badges, and light assemblies come together in a coordinated sequence that highlights the importance of symmetry in a high-end rebuild. The result is a rear end that mirrors the progress seen at the front, completing the car’s broader restoration narrative. The team’s collaboration culminates in a test and wrap-up sequence where the engine is started after multiple oil cycles, the dashboards and airbags are reinstalled, and the car is carefully wrapped in a fresh green finish. The video ends with a sense of accomplishment and a preview of future refinements as they prepare to push the car into final testing and a possible showroom-worthy finish. The 24-hour target is shown to be a flexible milestone rather than a hard deadline, with safety and reliability as the priority. The final shots celebrate the transformation from wreck to revival, even as the crew acknowledges that some issues may require further iteration beyond the initial time frame.
Topics · Autos & Vehicles · DIY & How-To · Automotive Restoration · Engineering & Technology · Creative Process
Questions answered
- What was the first major mechanical concern discovered after pulling the Ferrari 812 onto the lift?
- The first major concern was milky oil indicating water ingress, revealed after checking the dipstick and oil, which suggested potential engine issues.
- Why did the team remove the airbags and interior components early in the rebuild?
- Airbags and interior components were removed to access critical wiring, sensors, and crash data modules, and to safely repair or replace damaged components while ensuring safety compliance.
- What role did Bob from The Machine Shop play in the rebuild?
- Bob provided welding and fabrication expertise, rebuilding chassis legs, fabricating replacement parts, and helping restore structural integrity to the front of the car.
- How did the team attempt to verify engine health after initial repairs?
- They drained and refilled oil, drained the PCV system, and ran the engine to observe oil behavior, looking for milky oil and signs of water, to determine if further engine work was required.
- What color wrap was ultimately used for the rebuild and why?
- A bold neon green wrap was chosen to give the car a distinctive look and signal the transformation from wreck to revived vehicle.
- What safety risks are associated with salvaging a crash-damaged Ferrari 812, according to the video?
- Key risks include potential oil and water in the engine, compromised cranks if starting with contaminated cylinders, and the need to verify crash data on airbags and related systems before reassembly.
- How important was front-end alignment during the rebuild?
- Front-end alignment was critical to ensure proper fit of panels, headlights, and the under tray, and Bob used measurements to align crash bars and end plates precisely.
- What steps were involved in the interior reassembly process?
- Seats, belts, airbags, dashboard, and door cards were removed, repaired or replaced, and then reinstalled with careful attention to anchor points and electrical connections.