Mineral Oil Submerged PC Build Log Part 3 - Pouring the Oil
0 up · 0 down · 0 ratings
Description
Mineral Oil part 3 is finally here - today we pour! Phantom Glass link:
Channels and socials
Check out their awesome screen protectors at store.phantom.glass Sponsor link: linustechtips.com Pricing & discussion: linustechtips.com Support us: linustechtips.com Join our community forum: bit.ly twitter.com @LinusTech Intro Screen Music Credit: Adhesive Wombat -
Check out his channel here: youtube.com B-roll Music Credit: Approuching Nirvana - Their Story - youtube.com Outro Screen Music Credit: Approaching Nirvana - Sugar High youtube.com
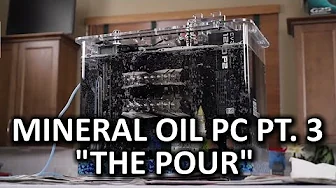
The video documents the third part of a mineral oil submerged PC build, focusing on the dramatic moment of pouring the oil into the system. The hosts describe the setup steps, including arranging the case, managing cables, and testing fitment for the fans and components before the pour. They discuss the challenges of routing cables and mounting hardware under the oil, acknowledging the risk of oil contact with components while maintaining a visually clean build. As the pour begins, there is a high level of ceremony and risk, with the hosts improvising solutions such as using newspaper and other materials to protect surfaces and control oil splash. The moment of truth arrives with the oil entering the case, revealing the bubbling effects and the immediate need to monitor bubbles, flow, and potential splashes, all while attempting to preserve the clean look of the hardware. After pouring, they observe the effect on the components, comment on the appearance of the bubbles and oil clarity, and discuss next steps like overclocking and thermal testing, signaling the transition from build to performance evaluation. The narrative emphasizes the dramatic shift from planning to execution, highlighting the DIY ethos as they troubleshoot fitment issues and modify the setup on the fly. They reflect on the accuracy of their previous assumptions, such as the placement of fans, power cables, and the bubble-maker, and they debate trade-offs between aesthetics and practicality. The pour itself becomes a test of both technique and luck, with moments of near-miss and improvisation that underscore the real-world risk of oil-cooled builds. Throughout, the hosts maintain a lighthearted tone, joking about the complexity of the project and keeping the audience engaged with visual cues like bubbles rising and the oil circulating. The video closes with a sense of achievement, confirming that the machine is built and partially operational, while outlining future experiments like temperature testing under idle and load conditions and potential equipment tweaks for improved performance. A core theme is the balance between engineering ambition and practical constraints, including the need for a better pump and more controlled oil flow to optimize cooling performance. They compare different hardware placements and discuss how oil behavior can alter acoustic and thermal characteristics, hinting at the non-trivial differences between oil cooling versus air cooling. The build is framed as both a technical experiment and a spectacle, inviting viewers to appreciate the artistry of a high-friction DIY project while understanding the risks involved. The sponsors and promotional segments are woven into the narrative, but the focus remains on the hands-on process of pouring and securing the oil within the case. The final sections lay out immediate next steps, such as confirming monitor readiness, testing stability, and preparing for more refined performance measurements, signaling the transition to the next phase of the project. Overall the video blends tutorial elements with entertainment, delivering a detailed account of the pour and its consequences while inviting viewers to anticipate subsequent performance results and potential refinements to the submerged PC build. The hosts pepper the dialogue with practical observations about component fit, cable management, and the importance of keeping the operation visually tidy despite working with a viscous liquid. The outcome feels triumphant yet provisional, celebrating the completion of the build while acknowledging that real-world testing will dictate the final viability and performance of the mineral oil cooled system. This part of the series serves as both a milestone and a setup for deeper technical exploration in the scenes that follow, including overclocking and thermal analysis under various loads.
Topics · technology · hardware · do-it-yourself · computer-modding · cooling · experimental
Questions answered
- What is the main purpose of pouring mineral oil in this build?
- The mineral oil pouring is intended to create a submerged cooling environment for the PC components, allowing the creators to explore oil cooling as an alternative to traditional air or water cooling.
- What challenges did the builders face during the pour?
- They faced issues with splash risk, managing cable and component clearance, ensuring the oil would flow properly without contacting sensitive parts, and coordinating the setup to avoid leaks and bubbles that could interfere with the hardware.
- What equipment decisions affected the pour?
- Decisions included how to route cables, where to place fans, whether to modify components with tape and makeshift supports, and selecting a suitable pump and power arrangement to circulate the oil.
- Were there any safety concerns noted during the pour?
- Yes, there were concerns about oil splashes, potential contamination of components, and ensuring that the setup would not leak or spill oil outside the case, prompting quick improvisations like using newspaper and protective barriers.
- What are the next steps after pouring the oil?
- Next steps include powering the system to test electronics and monitor temperatures, performing overclocking tests, and evaluating oil circulation and bubble dynamics to assess cooling performance.