UPGRADING the iMac Pro!?
0 up · 0 down · 0 ratings
Description
Thanks to iFixit for sponsoring today's video!
Promos
Check out their Manta, Mahi, Pro Tech Toolkits and more at ifixit.com Buy workstation PCs on Amazon: geni.us Discuss on the forum: linustechtips.com Our Affiliates, Referral Programs, and Sponsors: linustechtips.com Linus Tech Tips merchandise at designbyhumans.com Linus Tech Tips posters at crowdmade.com Our Test Benches on Amazon: amazon.com Our production gear: geni.us Twitter - twitter.com Facebook - @LinusTech Instagram - @linustech Twitch - twitch.tv Intro Screen Music Credit: Title: Laszlo - Supernova Video Link: youtube.com iTunes Download Link: itunes.apple.com Artist Link: soundcloud.com Outro Screen Music Credit: Approaching Nirvana - Sugar High youtube.com Sound effects provided by freesfx.co.uk
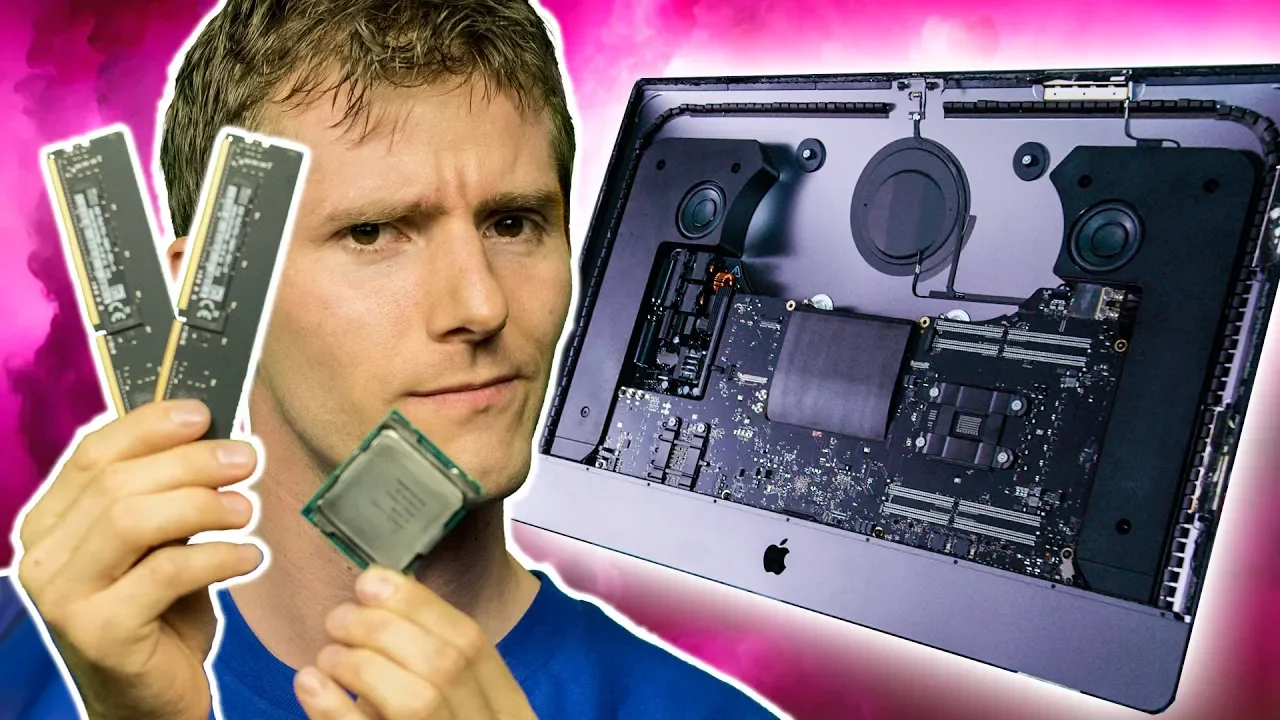
In this episode, Linus Tech Tips explores upgrading the iMac Pro by replacing key components to push the machine toward much higher memory capacity and CPU performance. The video frames the upgrade as a practical, if complex, DIY project sponsored by iFixit, and it centers on going from a stock eight‑core CPU with 32 GB of RAM to a high‑core Intel Xeon workstation setup with up to 18 cores and 128 GB of RAM, while aiming to save money versus buying a top spec Apple configuration. The host walks through the initial baseline benchmarking to establish a performance starting point, then disassembles the iMac Pro with the iFixit toolkit, carefully removing the display, fans, and the wifi card to access the motherboard. A significant portion of the segment focuses on the delicate process of removing and reassembling the cooling solution, handling fragile components, and maintaining proper orientation of mounting hardware to avoid damaging the board. The narrative underscores the architectural constraints of the iMac Pro, such as the GPU being baked into the motherboard, the T2 security chip linking storage and system integrity, and the limited upgradability primarily to CPU and RAM, while illustrating the practical challenges of upgrading within Apple’s closed system. After reinstalling the upgraded logic board and reassembling the display with new adhesive strips, the host powers up the machine and runs a fresh benchmark, revealing a substantial performance uplift that rivals Apple’s factory 18‑core configuration while delivering cost savings through DIY parts and parts sourcing. The closing moments emphasize the sponsorship role of iFixit, acknowledge the time spent on the upgrade, and celebrate the achieved performance gains, concluding with a nod to the community and resources for further guides and tools. The video frames the upgrade as a technically interesting, money‑saving experiment that demonstrates both the potential and the constraints of upgrading a premium all‑in‑one workstation. Viewers are left with a sense of accomplishment, appreciation for the sponsor, and interest in pursuing further DIY upgrades within the bounds of warranty considerations and product design limitations.
Topics · technology · hardware · diy · computing
Questions answered
- What is the main upgrade goal demonstrated in this iMac Pro project?
- The goal is to upgrade from 8 cores and 32 GB of RAM to up to 18 cores and 128 GB of RAM while saving money compared to buying a top‑tier Apple configuration.
- Which components are identified as upgradable in the iMac Pro, according to the video?
- CPU and RAM are identified as the main upgradeable components; GPU is baked into the motherboard and storage is constrained by the T2 chip, limiting upgradability.
- Why might this upgrade be challenging or risky for a typical user?
- The process involves delicate disassembly, careful reassembly of a complex all‑in‑one chassis, handling the heatsink with the CPU, sticky adhesives for the display, and potential warranty implications if Apple policy is triggered by DIY repairs.