REBUILDING MY CHEAP TOYOTA GT86 | SUBARU BRZ
0 up · 0 down · 0 ratings
Description
SILISHINE
Promos
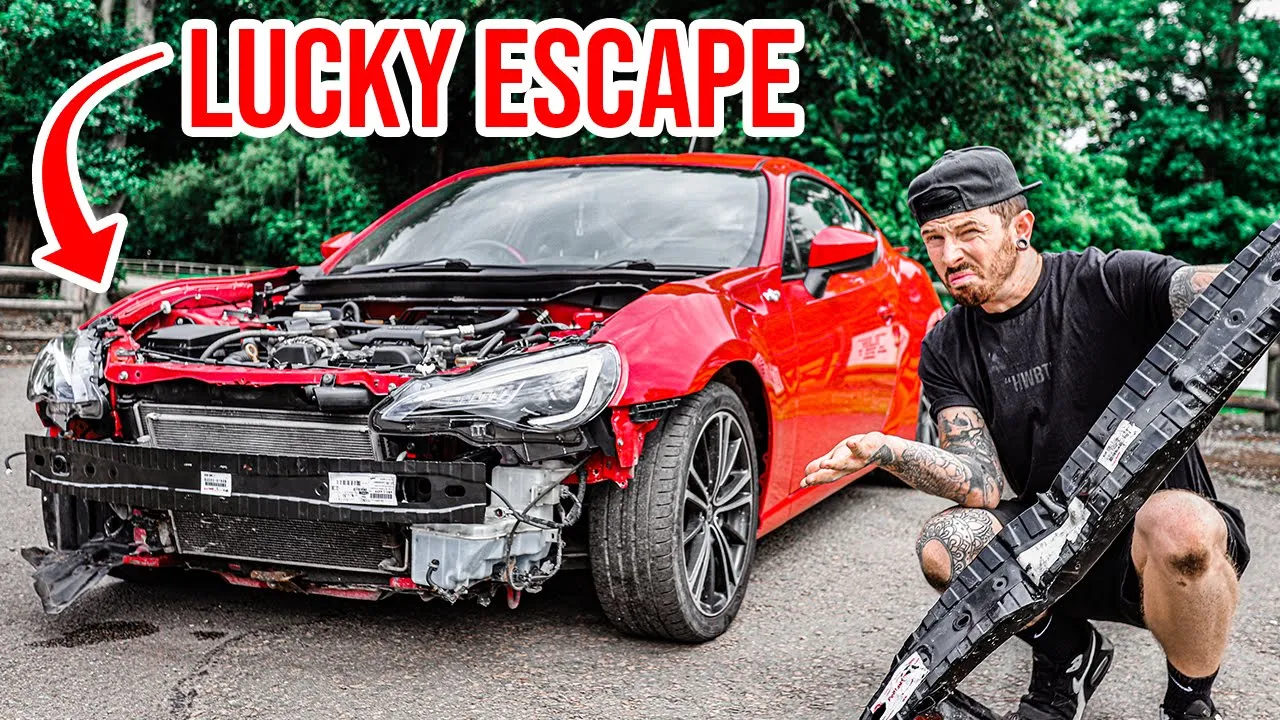
Head to squarespace.com to save 10% off your first purchase of a website or domain using code - matarmstrong I bought a crash damaged Toyota GT86 from auction a few weeks ago. The GT86 / Subaru BRZ / FRS is widely popular across the world, and getting it for such a cheap price i just couldn't say no. Although repairing it isnt as easy or as cheap as i first thought. Theres alot of aftermarket and performance modifications that can be done to the GT86 and you will see my plans towards the end of the video.
ALL MA MERCHANDISE
Channels and socials
Follow Me Here Aswell
@matarmstrongbmx @matarmstrongbmx #EP2 #GT86BUILD #SALVAGE Toyota Gt86, Subaru BRZ, FRS, TJ Hunt, Rocket Bunny Kit, Wide Body Build, BRZ, V3, Jap Build, Salvage Car, Crash Damaged, Rebuilding a Car, Samcrac, Rich Rebuilds, Copart, Chris Fix, JDM
Notes
The video opens with an introduction to a crash damaged Toyota GT86, highlighting the potential of the platform and the plan to repair it after buying it at auction for about four and a half thousand pounds. The creator explains the initial assessment, noting issues such as a bent front wishbone and the high cost of genuine parts, which motivates finding more affordable alternatives. He documents the interior cleaning process, removing seats and thoroughly vacuuming and wiping down plastics and carpets, while acknowledging that the seats will likely be replaced due to stains from a prior use. The early mechanical work focuses on the front suspension, where a secondhand wishbone is sourced and fitted after dealing with a stubborn ball joint, illustrating the debugging mindset typical of a rebuild project. Throughout, the video weaves in sponsor moments and technical tips, such as using squarespace for websites and the practicalities of evaluating the car's electrical codes with an OBD scanner. By the midpoint, the project pivots to the exterior damage, preparing to strip the front end to access the radiator pack and crash bar, and setting up the sequence for restoring drivability before heavier modifications. The creator also notes the car’s current fault indicators, such as engine and ABS lights, and frames these checks within the broader goal of turning the car from salvage to track-ready while planning for performance upgrades and a bold visual transformation.
Topics · autos & vehicles · do-it-yourself · car modification · rebuild project · customization
Questions answered
- What was the main obstacle in replacing the front suspension on the GT86 and how was it solved?
- The main obstacle was a bent front wishbone and a stubborn ball joint that refused to come out. A secondhand wishbone was sourced for a few hundred pounds, and the team used careful disconnects and, when needed, an angle grinder to remove the stubborn ball joint so the new part could be installed.
- Why did the builder choose a carbon bonnet and Rocket Bunny kit for the GT86 build?
- The carbon bonnet was chosen for its weight benefits and aggressive look after the original bonnet hinges appeared damaged. The Rocket Bunny kit was selected to transform the car into a more aggressive, track-ready appearance, while remaining cost-effective compared to a full OEM widebody conversion.
- What electrical issues were encountered and how were they addressed during the rebuild?
- The GT86 displayed engine and ABS lights. A mass air flow sensor issue was cleared after cleaning, and the ABS fault was also cleared, with the understanding that the ABS pump and map sensor might need replacement if lights returned. The initial diagnostic helped identify a faulty map sensor as the likely culprit for ongoing lighting and drivability concerns.